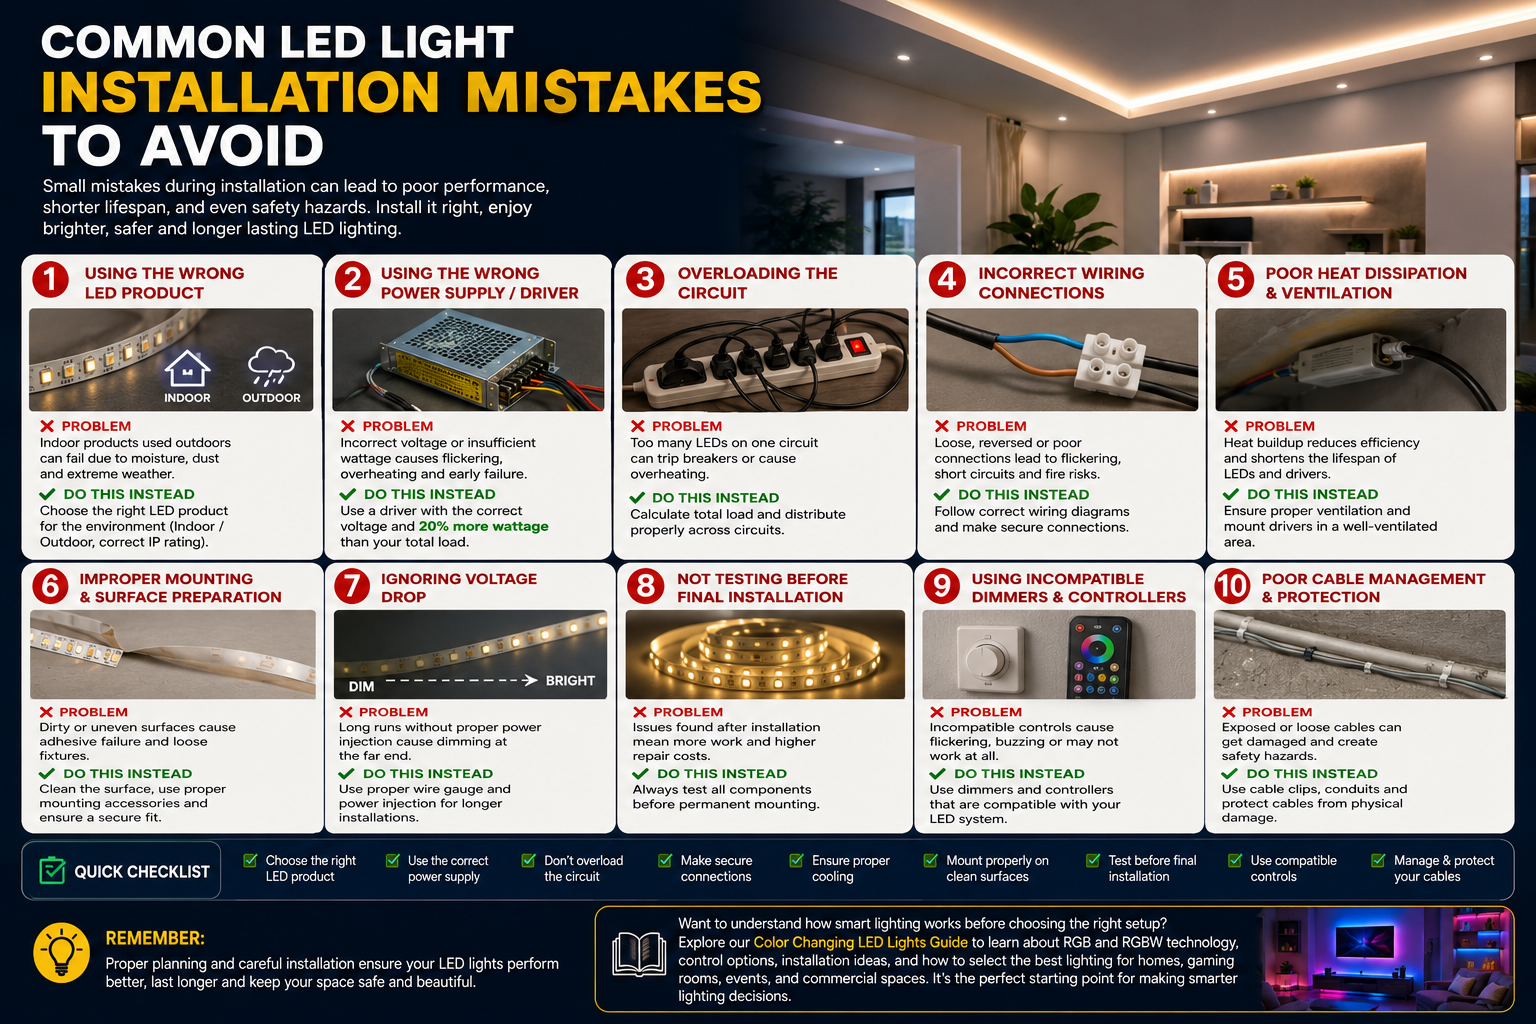
Proper LED lighting can completely transform a home, office, warehouse, or commercial building. Modern LED products consume significantly less electricity than traditional lighting while offering impressive brightness, longer operating life, and advanced smart features. However, even premium-quality products can fail prematurely if they are installed incorrectly. A reliable LED installation guide helps homeowners, electricians, contractors, and DIY enthusiasts avoid expensive mistakes that reduce performance and shorten the lifespan of LED lighting systems.
Many installation failures have little to do with the quality of the LED itself. Instead, they result from poor planning, incorrect voltage selection, inadequate wiring, improper mounting, incompatible power supplies, or overlooked environmental conditions. Small mistakes that seem harmless during installation often become major problems months later, leading to flickering lights, overheating, adhesive failure, or complete system breakdown.
This guide explains the most common LED light installation mistakes, why they happen, and how to prevent them. Whether you plan to install LED lights in your living room, kitchen, office, retail store, or outdoor landscape, these expert recommendations will help you complete a safe, efficient, and long-lasting LED lighting installation.
Why Proper LED Installation Matters
Installing LED lighting correctly is about much more than making lights turn on. Every component—including the LED fixture, driver, wiring, mounting surface, connectors, controllers, and power supply—must work together as a complete system. If one component is incompatible or installed incorrectly, the entire lighting system may suffer reduced efficiency, inconsistent brightness, premature failure, or safety hazards.
A properly designed installation delivers several important benefits. First, it improves electrical safety by reducing the risk of overheating, overloaded circuits, and loose wiring connections. Second, correct installation maximizes energy efficiency, ensuring the LEDs consume only the power they need while delivering consistent brightness. Third, proper planning reduces maintenance costs because components last longer and require fewer repairs. Finally, well-installed LED systems provide better aesthetics through uniform illumination, cleaner cable management, and professional-looking finishes.
Think of an LED lighting system like a car engine. Even if every individual part is high quality, poor assembly will affect performance and reliability. Similarly, high-end LED strips or bulbs cannot compensate for incorrect driver selection, poor ventilation, or inadequate mounting techniques. Spending a little more time planning the installation often saves hundreds of dollars in replacement costs and repairs over the years.
Want to understand how smart lighting works before choosing the right setup? Explore our Color Changing LED Lights Guide to learn about RGB and RGBW technology, control options, installation ideas, and how to select the best lighting for homes, gaming rooms, events, and commercial spaces. It’s the perfect starting point for making smarter lighting decisions.
Choosing the Wrong LED Product
One of the most common installation errors happens before any wiring begins. Selecting the wrong LED product can create disappointing lighting performance, compatibility issues, and unnecessary expenses. Many buyers focus only on price while overlooking critical specifications such as brightness, color temperature, beam angle, waterproof rating, and intended application. Choosing products based solely on appearance or cost often results in lighting systems that fail to meet expectations.
Indoor vs Outdoor Products
Indoor LED fixtures are designed for dry, temperature-controlled environments. Installing them outdoors exposes sensitive electronics to rain, humidity, dust, ultraviolet radiation, and temperature fluctuations that dramatically shorten their lifespan. Outdoor-rated LEDs feature weather-resistant housings, sealed connectors, and protective coatings specifically engineered for harsh environments.
For example, an LED strip installed beneath an outdoor deck without adequate moisture protection may initially work perfectly. After several weeks of exposure to humidity and rain, corrosion develops inside connectors, leading to flickering or complete failure. Selecting outdoor-rated products from the beginning eliminates this risk and reduces long-term maintenance.
Wrong Brightness Level, Color Temperature, and IP Ratings
Brightness is measured in lumens rather than watts. Many homeowners mistakenly replace old incandescent bulbs with LED bulbs of similar wattage instead of comparing lumen output. This often results in spaces that are either too dim or excessively bright. Understanding lumen requirements for each room ensures comfortable, functional lighting that matches the intended purpose.
Color temperature also plays a significant role in the atmosphere of a room. Warm white LEDs around 2700K create a cozy environment ideal for bedrooms and living areas, while neutral white options around 4000K work well in kitchens and offices. Daylight LEDs above 5000K provide crisp illumination for workshops and garages but may feel harsh in relaxation spaces.
IP ratings indicate protection against dust and water. Choosing the wrong rating is another common mistake. Dry indoor installations generally require lower IP ratings, while bathrooms, kitchens, gardens, and exterior architectural lighting demand higher levels of moisture protection. Matching the IP rating to the installation environment significantly improves reliability and lifespan.
Using the Wrong Power Supply or Driver
Even the highest-quality LED fixture cannot perform correctly without a compatible power supply or LED driver. Incorrect driver selection is responsible for many lighting problems, including flickering, overheating, reduced brightness, premature component failure, and shortened LED lifespan. Understanding voltage requirements before purchasing components is one of the most valuable LED installation tips any installer can follow.
Voltage Compatibility
LED products are manufactured for specific operating voltages such as 12V DC, 24V DC, or mains voltage depending on their design. Connecting a 12V LED strip to a 24V supply can permanently damage the LEDs almost instantly. Likewise, using insufficient voltage prevents the LEDs from operating correctly or causes uneven brightness across longer strip runs.
Always verify the voltage specified by the manufacturer before connecting any power source. Labels on LED strips, drivers, and controllers should match exactly. If different voltages are required within the same project, use separate power supplies rather than attempting unsafe modifications.
Driver Selection and Common Wiring Errors
Power supplies should provide additional capacity beyond the calculated load. For example, if an LED strip requires 80 watts, selecting a 100-watt or 120-watt driver provides a comfortable safety margin while reducing stress on the power supply. Continuously operating a driver at maximum capacity increases heat generation and significantly reduces service life.
Poor-quality drivers often produce unstable output voltage, causing visible flickering and inconsistent brightness. Investing in reputable power supplies with proper safety certifications improves efficiency, reliability, and long-term performance.
Common wiring mistakes include:
- Mixing positive and negative polarity
- Using undersized cables
- Loose terminal connections
- Exceeding recommended cable lengths
- Overloading a single driver
- Improper grounding where required
Carefully checking every wiring connection before energizing the system prevents costly repairs and improves overall safety.
Poor Installation Planning
Many LED installation problems originate from rushing into the project without a clear installation plan. Measuring inaccurately, purchasing incorrect quantities of materials, ignoring cable routing, or placing fixtures without considering lighting distribution often leads to disappointing results. Effective planning is one of the simplest ways to improve both installation quality and long-term performance.
Incorrect Measurements, Cable Routing, and Fixture Placement
Accurate measurements should always be the first step. Measure installation areas multiple times before purchasing LED strips, aluminum channels, power supplies, and extension cables. Small measurement errors may leave visible gaps or require unnecessary splicing that weakens the installation.
Cable routing deserves equal attention. Exposed wiring not only looks unprofessional but also increases the risk of accidental damage and maintenance difficulties. Planning concealed cable paths, junction box locations, and driver placement creates a cleaner installation while simplifying future servicing.
Fixture placement should complement how a room is used rather than simply filling empty spaces. Kitchen worktops require focused task lighting, while living rooms often benefit from indirect ambient illumination. Commercial environments may prioritize uniform brightness to improve productivity, whereas architectural installations emphasize accent lighting to highlight structural features.
Another frequently overlooked consideration is future expansion. Homeowners increasingly add smart lighting controllers, dimmers, additional LED strips, or automation systems after the initial installation. Leaving spare capacity in the electrical design allows future upgrades without replacing the entire lighting system.
LED Installation Planning Checklist
| Task | Completed |
| Measure installation area accurately | □ |
| Calculate total power consumption | □ |
| Select compatible voltage | □ |
| Choose correct LED driver | □ |
| Plan cable routing | □ |
| Verify mounting surfaces | □ |
| Check waterproof requirements | □ |
| Allow room for future expansion | □ |
A thoughtful installation plan transforms a potentially frustrating DIY project into a smooth, professional-quality installation. Taking time to prepare before opening the first package often determines whether an LED lighting system performs reliably for years or develops problems shortly after installation.
Part 2: Common LED Light Installation Mistakes to Avoid (Continued)
Installing on Dirty or Uneven Surfaces
One of the most frustrating problems with LED strip light installation is discovering that the strips start peeling away from the surface after a few days or weeks. Most adhesive-backed LED strips rely on strong bonding between the adhesive layer and the mounting surface. Dust, grease, paint residue, moisture, or textured surfaces significantly reduce adhesive strength and cause strips to detach over time.
Dirty surfaces also create another hidden issue: poor heat transfer. LED strips generate heat during operation, and mounting them on uneven or contaminated surfaces can trap heat instead of allowing it to dissipate. Excess heat reduces brightness, shortens lifespan, and increases the risk of premature failure.
Best Practices for Surface Preparation
Professional installers rarely apply LED strips directly onto an unprepared surface. Instead, they clean the area thoroughly with a suitable degreaser or isopropyl alcohol, allow it to dry completely, and ensure the surface is smooth and stable.
For long installations or areas exposed to heat and humidity, mounting clips or aluminum channels provide much better long-term reliability than adhesive alone. These mounting methods prevent sagging, improve heat dissipation, and create a cleaner, more professional appearance.
Best practices
- Clean surfaces thoroughly before installation.
- Remove grease, dust, and loose paint.
- Allow surfaces to dry completely.
- Use aluminum channels for long runs.
- Add mounting clips in high-temperature areas.
- Avoid installing on rough or peeling surfaces.
Cutting LED Strip Lights Incorrectly
Many DIY installers assume LED strips can be cut anywhere along their length. Unfortunately, cutting in the wrong location can permanently damage a section of the strip and make reconnection difficult. Manufacturers include designated cut marks that correspond to the electrical circuit design of the strip.
Where LED Strips Can Be Cut
Most LED strips have clearly marked cutting points, usually indicated by a scissors icon or copper pads. Cutting between these marked sections preserves the electrical circuit and allows the remaining strip to function correctly.
Connector Compatibility
Not all LED strip connectors are universal. Width, voltage, and strip type must match the connector design. Attempting to force an incompatible connector often results in intermittent connections, flickering, or complete failure.
Reconnecting Sections Safely
After cutting, sections can be reconnected using soldered joints or compatible clip connectors. Soldering generally provides the most reliable connection, especially for permanent installations or outdoor applications.
Correct cutting sequence
LED Strip
[ LED ]—[ LED ]—✂—[ LED ]—[ LED ]
Cut only at the marked ✂ location
Ignoring Heat Management
Many people believe LEDs produce almost no heat. While LEDs are far more efficient than incandescent bulbs, they still generate heat that must be managed properly. Excessive heat is one of the biggest factors affecting LED lifespan and long-term reliability.
Heat Dissipation
When LEDs operate at elevated temperatures for extended periods, light output gradually decreases and electronic components age faster. This process, known as lumen depreciation, causes LEDs to become dimmer over time.
Aluminum Channels
Aluminum channels act as heat sinks that help draw heat away from LED strips. They are especially important for high-brightness strips, under-cabinet lighting, architectural installations, and long continuous runs.
Ventilation and Long-Term Reliability
Enclosed spaces without ventilation can trap heat around LED drivers and strips. Leaving adequate airflow around power supplies and avoiding tightly sealed cavities improves reliability and reduces the risk of overheating.
Heat Management Comparison
| Installation Method | Heat Dissipation |
| Adhesive on wood | Poor |
| Adhesive on metal | Moderate |
| Aluminum channel | Excellent |
| Ventilated aluminum channel | Best |
Incorrect Wiring and Connections
Wiring problems account for a large percentage of LED installation failures. Even a small connection error can cause flickering, intermittent operation, voltage drop, or complete system shutdown. Careful attention to polarity, connection quality, and cable management is essential.
Reverse Polarity
Many low-voltage LED products require correct positive (+) and negative (–) connections. Reversing polarity may prevent operation or, in some cases, damage sensitive electronics.
Loose Connections
Loose terminal screws, poorly crimped connectors, and partially inserted plugs create resistance that generates heat and causes unreliable performance.
Poor Cable Management
Messy wiring makes troubleshooting difficult and increases the likelihood of accidental disconnections. Professional installers secure cables neatly and label important connections.
Waterproof Connectors
For outdoor or wet-area installations, standard connectors are often insufficient. Waterproof connectors with proper sealing help prevent corrosion and moisture-related failures.
Quick troubleshooting examples
| Problem | Likely Cause |
| LEDs do not turn on | Reverse polarity or no power |
| Flickering lights | Loose connection or poor driver |
| Dim end of strip | Voltage drop on long run |
| Intermittent operation | Faulty connector or damaged cable |
| Outdoor strip fails after rain | Non-waterproof connection |
Key Takeaways from Part 2
- Always prepare mounting surfaces properly.
- Cut LED strips only at marked locations.
- Use compatible connectors or soldered joints.
- Manage heat with aluminum channels and ventilation.
- Verify polarity and secure all wiring connections.
- Use waterproof connectors where moisture is present.
Ignoring Smart Lighting Compatibility
Smart LED lighting has transformed the way people illuminate homes and commercial spaces. Instead of simply turning lights on and off, today’s systems allow users to adjust brightness, change colors, create schedules, automate lighting scenes, and control everything remotely through smartphones or voice assistants. While these features make smart LED light installation more attractive than ever, they also introduce compatibility challenges that many DIY installers overlook. Purchasing devices from different manufacturers without checking whether they work together can result in frustrating setup issues, limited functionality, or complete incompatibility.
Before buying smart lighting components, determine which ecosystem you intend to use. Some products communicate through Wi-Fi, while others rely on Bluetooth, Zigbee, Thread, or proprietary wireless protocols. Mixing incompatible technologies often prevents controllers from recognizing LED strips or bulbs. A little research beforehand saves hours of troubleshooting after installation.
Controller Compatibility
Every smart LED controller is designed to support specific voltage ranges, LED types, and communication protocols. RGB controllers, RGBW controllers, and tunable white controllers are not interchangeable. Installing the wrong controller may prevent color changes, reduce brightness control, or disable smart features entirely.
Professional installers recommend purchasing compatible products from the same product family whenever possible. Manufacturers typically test their controllers, power supplies, and LED fixtures together, minimizing compatibility issues and ensuring smoother operation.
App Setup
Many installation problems occur during software configuration rather than physical installation. Users often skip firmware updates, connect devices to unsupported Wi-Fi bands, or fail to grant required permissions within mobile applications.
For the best experience:
- Install the manufacturer’s latest app.
- Update controller firmware immediately after setup.
- Keep device names organized.
- Create lighting groups by room.
- Back up automation settings if supported.
Wi-Fi vs Bluetooth
Choosing between Wi-Fi and Bluetooth depends on how the lighting system will be used.
| Feature | Wi-Fi | Bluetooth |
| Remote access | Yes | Limited |
| Internet required | Usually | No |
| Installation complexity | Moderate | Easy |
| Multi-room control | Excellent | Limited |
| Voice assistant support | Excellent | Varies |
Wi-Fi systems are ideal for smart homes that require remote access and voice control. Bluetooth solutions are simpler to install and work well for individual rooms or portable lighting.
Firmware Updates
Firmware updates improve security, introduce new features, fix bugs, and enhance compatibility with smart home ecosystems. Ignoring updates can cause connection failures or prevent new devices from integrating correctly.
A good habit is to check for firmware updates every few months, especially after purchasing additional smart lighting accessories.
Overlooking Waterproof Requirements
Water and electricity are never a good combination. One of the most common LED installation mistakes is assuming that all LED products can withstand moisture. In reality, different lighting environments require different levels of environmental protection. Installing standard indoor LED strips in bathrooms, kitchens, patios, swimming pool areas, or outdoor landscapes can quickly lead to corrosion, electrical faults, and premature failure.
Understanding IP (Ingress Protection) ratings is essential when selecting LED products. These ratings indicate how well a fixture is protected against dust and water. Choosing the correct rating ensures reliable performance and minimizes maintenance costs over the life of the installation.
Indoor vs Outdoor Ratings
Indoor environments generally expose lighting to minimal moisture, making lower IP ratings sufficient for most applications. Outdoor installations face rain, humidity, dirt, insects, and temperature fluctuations, requiring significantly greater protection.
Bathrooms, laundry rooms, and kitchens occupy a middle ground. Although they are indoors, frequent exposure to steam, splashing water, and humidity means higher IP-rated products are usually the better choice.
IP65, IP67, and IP68 Comparison
Selecting the correct waterproof rating is easier when you understand what each level offers.
| IP Rating | Dust Protection | Water Protection | Recommended Applications |
| IP20 | Basic | None | Bedrooms, offices, living rooms |
| IP65 | Dust resistant | Water jets | Kitchens, bathrooms, patios |
| IP67 | Dustproof | Temporary immersion | Gardens, decks, outdoor walls |
| IP68 | Dustproof | Continuous immersion | Pools, fountains, underwater features |
Although higher IP ratings provide greater protection, they are not always necessary. Using IP68 products indoors may increase costs without offering meaningful benefits.
Weatherproof Wiring
Protecting the LED fixture alone is not enough. Wiring, connectors, junction boxes, and power supplies also require appropriate weather protection. Moisture entering an unsealed connector can interrupt power flow, create corrosion, and eventually damage the entire system.
Professional installers use waterproof connectors, heat-shrink tubing, silicone sealants, and weatherproof electrical enclosures to keep connections protected from the elements.
Moisture Protection Best Practices
To maximize reliability:
- Seal all outdoor cable entries.
- Keep power supplies above ground level.
- Avoid placing drivers in standing water.
- Inspect outdoor wiring annually.
- Replace damaged seals immediately.
Proper waterproofing not only improves safety but also extends the operating life of the entire LED lighting system.
Skipping Final Testing
Many installers consider the project finished as soon as the lights turn on. In reality, successful LED lighting installation requires thorough testing before the system is put into everyday use. Final testing helps identify hidden problems that may not be immediately visible but could cause failures later.
Testing every component before permanently securing fixtures or concealing wiring can save significant time and repair costs.
Verify Brightness
Inspect each fixture carefully to ensure consistent brightness throughout the installation. Dim sections often indicate voltage drop, overloaded drivers, or poor electrical connections.
Check Color Accuracy
Color-changing systems should display every available color correctly. White LEDs should maintain consistent color temperature without noticeable differences between fixtures.
Test Remote Controls and Smart Functions
Verify that:
- Mobile applications connect successfully.
- Voice assistants respond correctly.
- Dimmers operate smoothly.
- Schedules and automation routines function properly.
- Remote controls communicate reliably.
Testing these features before finalizing the installation makes troubleshooting much easier.
Inspect Wiring Integrity
Carefully inspect all electrical connections for:
- Loose terminals
- Damaged insulation
- Exposed conductors
- Overheated connectors
- Proper cable support
Even minor wiring issues should be corrected immediately before regular operation begins.
Confirm Power Stability
Allow the system to operate continuously for at least 20 to 30 minutes. Observe whether brightness remains stable and verify that power supplies, drivers, and connectors remain within safe operating temperatures.
Post-Installation Testing Checklist
| Inspection Item | Complete |
| Brightness verified | □ |
| Color accuracy checked | □ |
| Smart controls tested | □ |
| Remote functions confirmed | □ |
| Wiring inspected | □ |
| Voltage verified | □ |
| Driver temperature checked | □ |
| Waterproof seals inspected | □ |
| Automation tested | □ |
| Final cleaning completed | □ |
Performing these final checks ensures that the installation delivers reliable performance from day one while reducing the likelihood of future service calls or unexpected failures.
Professional Tips for a Successful LED Installation
A successful LED installation guide is built on careful planning, quality components, and attention to detail. Professional electricians rarely rush into an installation because they understand that every decision—from product selection to cable routing—affects the performance, efficiency, and lifespan of the entire lighting system. Whether you are installing a single LED bulb or designing a complete smart lighting network, following proven best practices will help you achieve professional-quality results.
Plan Ahead
Before purchasing any equipment, prepare a detailed lighting plan. Measure every installation area accurately, calculate the total wattage required, identify power source locations, and decide where controllers and drivers will be installed. Planning ahead minimizes installation delays, prevents material shortages, and reduces unnecessary expenses.
Choose Quality Components
High-quality LED fixtures deserve equally reliable supporting components. Invest in certified LED drivers, power supplies, connectors, extension cables, and mounting accessories from reputable manufacturers. Cheap components often become the weakest link in an otherwise well-designed installation.
Use Proper Mounting Methods
Whenever possible, install LED strips inside aluminum channels or use mechanical mounting clips instead of relying solely on adhesive backing. Proper mounting improves heat dissipation, protects the LEDs from physical damage, and creates a cleaner, more professional appearance.
Maintain Your LED Lighting System
Although LED lighting requires very little maintenance, occasional inspections help identify minor issues before they become major problems. Clean fixtures regularly, inspect connectors for corrosion, verify that mounting hardware remains secure, and update smart lighting firmware whenever updates become available.
Upgrade Smart Lighting Thoughtfully
If you plan to expand your lighting system in the future, choose controllers and power supplies that allow additional fixtures to be added later. Designing with scalability in mind saves money and simplifies future upgrades.
DIY vs Professional LED Installation
Many homeowners successfully complete basic LED lighting projects themselves. However, larger installations involving electrical panels, high-voltage wiring, smart home integration, or commercial facilities often benefit from professional expertise.
| Factor | DIY Installation | Professional Installation |
| Cost | Lower upfront cost | Higher initial investment |
| Skill Level | Beginner to Intermediate | Certified expertise |
| Installation Time | Longer | Faster |
| Safety | Depends on experience | High |
| Warranty Protection | Limited | Often preserved |
| Troubleshooting | Self-managed | Professional support |
| Best For | Small residential projects | Large, complex, commercial, and smart installations |
For simple LED bulb installation, under-cabinet lighting, or basic LED strip installations, experienced DIY users can often complete the project safely. If the installation involves new circuits, electrical code compliance, outdoor power distribution, or smart automation systems, hiring a qualified electrician is usually the better long-term investment.
LED Installation Safety Checklist
Before energizing your lighting system, complete the following safety checklist:
Electrical Safety Checklist
- □ Turn off electrical power before beginning work.
- □ Verify voltage using an appropriate tester.
- □ Confirm the correct LED driver has been selected.
- □ Match driver voltage with LED voltage.
- □ Inspect all wiring for damage.
- □ Tighten all electrical connections.
- □ Secure all mounting hardware.
- □ Keep cables away from sharp edges.
- □ Install waterproof protection where required.
- □ Verify proper grounding where applicable.
- □ Test smart controllers and dimmers.
- □ Confirm adequate ventilation around power supplies.
- □ Complete full functional testing before regular use.
Completing these steps greatly reduces the likelihood of electrical faults, premature component failure, and unnecessary maintenance.
Conclusion
A successful LED installation guide is not simply about connecting wires and turning on the lights. Long-lasting, energy-efficient lighting systems depend on careful planning, correct product selection, proper driver sizing, safe wiring practices, effective heat management, and thorough post-installation testing. Even premium LED products can experience poor performance if they are installed incorrectly.
By avoiding the ten common LED light installation mistakes discussed in this guide, homeowners, contractors, electricians, and facility managers can significantly improve lighting performance while extending the lifespan of their investment. Selecting compatible components, preparing mounting surfaces properly, using appropriate waterproof protection, and verifying every connection before energizing the system are small steps that produce substantial long-term benefits.
Frequently Asked Questions
1. What are the most common LED installation mistakes?
The most common mistakes include choosing the wrong LED product, using an incompatible power supply, poor installation planning, incorrect wiring, inadequate heat management, improper waterproofing, and skipping final testing.
2. Can the wrong power supply damage LED lights?
Yes. Using the wrong voltage or an undersized driver can cause overheating, flickering, reduced brightness, or permanent damage to LED fixtures.
3. Why are my LED lights flickering?
Flickering is usually caused by loose wiring, incompatible dimmers, overloaded drivers, voltage fluctuations, or poor-quality power supplies.
4. How do I prevent LED strips from falling off?
Clean the mounting surface thoroughly, allow it to dry, and use aluminum channels or mounting clips for additional support.
5. Can LED strips overheat?
Yes. Although LEDs generate less heat than traditional lighting, poor ventilation or improper mounting can cause excessive heat buildup that shortens their lifespan.
6. What IP rating should I choose?
Choose IP20 for dry indoor areas, IP65 for damp environments, IP67 for outdoor installations, and IP68 for underwater applications.
7. Should I install LED lights myself?
Basic installations are suitable for experienced DIY users. Complex electrical work, commercial projects, and new circuit installations should be completed by qualified professionals.
8. Why won’t my smart LED lights connect?
Common causes include incompatible controllers, incorrect Wi-Fi settings, outdated firmware, poor signal strength, or unsupported smart home platforms.
9. How long should properly installed LED lights last?
High-quality LED products that are installed correctly often provide between 25,000 and 50,000 hours of service, with premium commercial fixtures lasting even longer.
10. Do LED lights require maintenance?
Yes, although maintenance requirements are minimal. Periodic cleaning, connector inspection, firmware updates, and checking for loose wiring help maximize performance and lifespan.